My default method for anything that requires a GUI (Graphical User Interface) is to use Tkinter. In fact I have written a blog post which explains how to create a basic GUI in Tkinter.
Python - Rock Paper Scissors inside a GUI
Tkinter does the job of GUI creation well, and if you need buttons and space for users to type information, it's good. However I often feel it is not very dynamic. When you want the screen to update depending on your interaction with it, it is cumbersome.
I was curious to see if Pygame would fare any better. While thinking of a way to test this out the idea of writing a Sudoku solver popped into my head. For those who are unsure of what a Sudoku is it is a logic based number puzzle. Further details can be found on the Sudoku wiki page.
I thought this would be perfect for interacting with as the user would have to select which numbers are known in the blank Sudoko, and it would have to update depending on the information given.
Before getting too excited, the Sudoku solver in this blog post will not solve all Sudoku. It will only solve basic Sudoku. The reason for this is I wanted to show the Sudoku updating as more information was supplied to it. Therefore this solver works in the way a human would solve the puzzle, rather than using a brute force method of running through all possibilities. As puzzles get more complex, so do the methods people employ to solve them. I have programmed just a couple of these as they were enough to demonstrate this interaction between the user and the screen. However the program you will end up with can be adapted to include other methods people use to solve Sudoku. If I feel so inclined, I may cover these in a future blog post.
Pygame comes as standard on the Raspberry Pi, so there is no installation required, however if you are using a different platform for programming then you can download it from here:
http://www.pygame.org/news.html
For those of you who have read my blog post about the Game of Life you will have seen that I highly rate the work of Al Sweigart. He has written three excellent books about programming in Python. These are called 'Invent Your Own Computer Games with Python', 'Making Games with Python and Pygame' and 'Hacking Secret Ciphers with Python'. All three are free and can be found on the website http://inventwithpython.com
Details of how Pygame works is outside of the scope of this blog, and besides Al Sweigart does a better job than I could of explaining it. If you would like further details you will find them in his book 'Making Games with Python and Pygame'.
I have broken the development of this program down into smaller steps, so you can see how the program evolved as I programmed it.
There are eight steps.
1. Draw a blank pygame screen
2. Draw a grid on the screen
3. Populate a completely blank puzzle
4. Add in the ability to select different numbers with the mouse
5. Update the screen as numbers are selected
6. Implement the first method of solving Sudoku
7. Allowing correction of mistakes
8. Implement a second method of solving Sudoku
As I ask you to type code, I will often show not only the line you need to type in but a few extra lines to illustrate where you should type the code.
Step 1 - Draw a blank screen
The purpose of this section is to create a blank screen as shown below.

The first thing I needed to achieve was to get a blank screen up and running. As I mentioned in my Game of Life blog Al Sweigart provided the code to do this, so I did not have to go re-inventing the wheel.
Type in the following and then press F5 to save and run the code.
import pygame, sys
from pygame.locals import *

pygame.init()
DISPLAYSURF = pygame.display.set_mode((400,300))
pygame.display.set_caption('Hello World')

while True: #main game loop
    for event in pygame.event.get():
        if event.type == QUIT:
            pygame.quit()
            sys.exit()
    pygame.display.update()
While this works and creates a blank Pygame window I am going to develop this code a little at this stage.
The first thing I will do is add all the code, other than the import statements, into a main function.
def main():
    pygame.init()
    DISPLAYSURF = pygame.display.set_mode((400,300))
    pygame.display.set_caption('Hello World')

    while True: #main game loop
        for event in pygame.event.get():
            if event.type == QUIT:
                pygame.quit()
                sys.exit()
        pygame.display.update()
Then add some code at the very end of the program to call the main function.
We also need to add the global variables FPSCLOCK and DISPLAYSURF into the main function.sys.exit() pygame.display.update()if __name__=='__main__': main()
def main():
    global FPSCLOCK, DISPLAYSURF
and under the pygame.init() command define what these global variables are:
    pygame.init()
    FPSCLOCK = pygame.time.Clock()
    DISPLAYSURF = pygame.display.set_mode((WINDOWWIDTH,WINDOWHEIGHT))
DISPLAYSURF was already there, but you will see that I have replaced the 400 and 300 with a couple of global variables, WINDOWWIDTH and WINDOWHEIGHT. So lets ensure we specify those global variables in our code, put them outside the main function, under the two import statements.
import pygame, sys
from pygame.locals import *

# Sets size of grid
WINDOWWIDTH = 270
WINDOWHEIGHT = 270
Why have I done this? Well in future if I want to modify the width or height of the window it would be quite hard to find the location of the 400 and 300 within my program. If I was reading my code it is not obvious what these values relate to. By using global variables such as WINDOWWIDTH and WINDOWHEIGHT the meaning is very obvious. It also means if I need to use the values of width or height again in the program, and then decide to modify those values, I only have to change the values at one central location. It makes my code easier to read and modify, which has to be a good thing!
The other thing we will want is to keep the screen updated at regular intervals, to ensure it captures any changes. We can dictate the number of Frames Per Second (FPS) which dictates how often our program updates. Each time the program updates is often referred to as a tick. So 10 frames Per Second would mean the program runs through 10 ticks every second.
First of all lets set a global variable to determine the number of FPS we would like our program to run with.
Under the two import statements, but above the variables WINDOWWIDTH and WINDOWHEIGHT add the following.
import pygame, sys
from pygame.locals import *

#Number of frames per second
FPS = 10
We need to tell our program we want it to run a new tick using the value in the FPS global variable. So at the bottom of the while loop add FPSCLOCK.tick(FPS).
        pygame.display.update()
        FPSCLOCK.tick(FPS)
Finally lets make the background white. To do this we use the DISPLAYSURF.fill command. The command expects you to input a colour in terms of the amount of Red, Green and Blue used to make up the colour. These three values are often referred to as RGB. However as with the window width and height it makes sense to define the colours in one place. Then if you need to modify them there is one central location to do so.
So under the size of the grid variables set a global variable for white.
# Sets size of grid
WINDOWWIDTH = 270
WINDOWHEIGHT = 270

# Set up the colours
WHITE =    (255,255,255)
And within the main loop use DISPLAYSURF.fill to set the background to white.
    pygame.display.set_caption('Sudoku Solver')

    DISPLAYSURF.fill(WHITE)
Oh and don't forget to change the name of the window from 'Hello World' to 'Sudoku Solver'.
Press F5 to run the program. Does it look like the image at the start of this section?
Sudoku Step 1 Source Code
Step 2 - Draw a grid on the screen
The purpose of this section is to update our blank screen with grid lines.

We would like to draw a grid on the screen to map out our Sudoku puzzle. When you look at a Sudoku grid you see that it is made up of a grid of 3 x 3 squares. Each of these squares is in turn made up of a 3 x 3 grid. The large squares are usually separated by a darker line than the smaller squares as shown above.
# Set up the colours
BLACK =    (0,  0,  0)
WHITE =    (255,255,255)
LIGHTGRAY = (200, 200, 200)
We will create a function, lets call it drawGrid(), which holds all the code to draw the grid. We will call the function to draw the grid within our main function. The first time we draw the grid we will draw it outside of the while loop in the main function, but we do want to draw the grid after we have made the background white, otherwise we will be overwriting our grid. Therefore after making the background white call the function drawGrid().
Before we get into writing the drawGrid() function we should have a think about what information we need in order to draw the grid.DISPLAYSURF.fill(WHITE) drawGrid()
We need our window height and width splitting into three equal sizes to create the larger squares. We also need to split the height and width of the window into 9 smaller squares to make the smaller cells. It's in effect a 9 x 9 grid we are looking at.
We probably don't want the small squares to be too small as we are going to want to display something in there, it would not be much of a Sudoku solver if we could not display numbers!
When we talk about window height and width, we define these in terms of number of pixels. Therefore to make the division nice it would be good if we could only make the window a size that is divisible by 9 and keep it as whole numbers (integers).
Therefore if I create a global variable which defines the WINDOWSIZE as 90 and a second called WINDOWMULTIPLIER which would be an integer. We can say that WINDOWSIZE x WINDOWMULTIPLIER will always be divisible by 9, and the smallest value of WINDOWSIZE x WINDOWMULTIPLIER when divided by 9 will be 10. We all know 90 / 9 = 10.
So under the FPS global variable type the following
FPS = 10

# Sets size of grid
WINDOWMULTIPLIER = 5
WINDOWSIZE = 90
We can use this value to then set the size of the window by making
WINDOWWIDTH = WINDOWSIZE * WINDOWMULTIPLIER
WINDOWHEIGHT = WINDOWSIZE * WINDOWMULTIPLIER
These should replace the existing values for WINDOWHEIGHT and WINDOWWIDTH.
So if we wanted to make the window larger or smaller we only need to change the value in WINDOWMULTIPLIER and we know this will always be divisible by 9 and will mean the smaller squares don't get too small.
Now to get the size of the 3 x 3 group of cells divided by the darker lines, lets call these squares, we can divide the size of the window by three. Rather than doing this each time it would be easier if we could just call a global variable with the right information in there.
SQUARESIZE = (WINDOWSIZE * WINDOWMULTIPLIER) / 3and if we divide SQUARESIZE by 3 we will get the size of the smaller cells.
CELLSIZE = SQUARESIZE / 3OK so we should now have the following global variables typed under the FPS global variable.
# Sets size of grid
WINDOWMULTIPLIER = 5 # Modify this number to change size of grid
WINDOWSIZE = 90
WINDOWWIDTH = WINDOWSIZE * WINDOWMULTIPLIER
WINDOWHEIGHT = WINDOWSIZE * WINDOWMULTIPLIER
SQUARESIZE = (WINDOWSIZE * WINDOWMULTIPLIER) / 3
CELLSIZE = SQUARESIZE / 3
I have added a note to the WINDOWMULTIPLIER to remind me in the future to modify that value if I want to change the size of the window.
Armed with all this information about the size of the grid we are now able to write our function to draw the grid.
Under the global variables you should create a new function called drawGrid.
LIGHTGRAY = (200, 200, 200)

def drawGrid():
First lets look at the code for the whole function and then look into the individual lines.
We are drawing the grid lines to separate the smaller cells first. If we draw the darker lines which separate the larger cells first, the lighter ones would over write these.def drawGrid(): ### Draw Minor Lines for x in range(0, WINDOWWIDTH, CELLSIZE): # draw vertical lines pygame.draw.line(DISPLAYSURF, LIGHTGRAY, (x,0),(x,WINDOWHEIGHT)) for y in range (0, WINDOWHEIGHT, CELLSIZE): # draw horizontal lines pygame.draw.line(DISPLAYSURF, LIGHTGRAY, (0,y), (WINDOWWIDTH, y)) ### Draw Major Lines for x in range(0, WINDOWWIDTH, SQUARESIZE): # draw vertical lines pygame.draw.line(DISPLAYSURF, BLACK, (x,0),(x,WINDOWHEIGHT)) for y in range (0, WINDOWHEIGHT, SQUARESIZE): # draw horizontal lines pygame.draw.line(DISPLAYSURF, BLACK, (0,y), (WINDOWWIDTH, y)) return None
First we will draw the vertical lines
The first line in this code is saying make x = 0. Then add the value CELLSIZE to x. Repeat until x reaches the value in WINDOWWIDTH.for x in range(0, WINDOWWIDTH, CELLSIZE): # draw vertical lines pygame.draw.line(DISPLAYSURF, LIGHTGRAY, (x,0),(x,WINDOWHEIGHT))
The second line indicates what to do at each of these increments. It says draw a line on DISPLAYSURF, using the colour LIGHTGRAY, starting at co-ordinate (x,0) and ending at (x, WINDOWHEIGHT)
So the line starts at y = 0 and ends at y = WINDOWHEIGHT meaning the line is vertical the full length of the screen. x varies at each increment, meaning vertical lines are draw along the screen at intervals dictated by CELLSIZE.
Try running the code at this stage to see if it gives you what you expected. Did you see this?

This code can easily be modified to draw the horizontal lines.
Notice that it is y that is changing each time, and not x. All horizontal lines runs from 0 to WINDOWWIDTH.for y in range (0, WINDOWHEIGHT, CELLSIZE): # draw horizontal lines pygame.draw.line(DISPLAYSURF, LIGHTGRAY, (0,y), (WINDOWWIDTH, y))
The very same principle is used for the horizontal and vertical lines for the thicker lines.
However the colour used is BLACK and the separation is SQUARESIZE and not CELLSIZE### Draw Major Lines for x in range(0, WINDOWWIDTH, SQUARESIZE): # draw vertical lines pygame.draw.line(DISPLAYSURF, BLACK, (x,0),(x,WINDOWHEIGHT)) for y in range (0, WINDOWHEIGHT, SQUARESIZE): # draw horizontal lines pygame.draw.line(DISPLAYSURF, BLACK, (0,y), (WINDOWWIDTH, y))
Finally finish the function with
return NoneTry running the program. Do you see the image at the top of this section?
Great that finishes of the second part of the program!
Sudoku Step 2 Source Code
Step 3 - Populate a completely blank puzzle
The purpose of this section is to show the remaining numbers available for each cell in the grid. This will allow us to pick the number we want to populate that cell, and to display the remaining numbers as we start to solve our Sudoku.

Now we have our blank grid looking good we can start the serious work of populating it. The first thing we need to consider is how are we going to input the number into each square, and how are we going to feedback the potential remaining numbers as our Sudoko starts to be solved?
We could put all 9 possible numbers (1-9) in each of the smaller grids. We could then highlight the number we wanted to choose with a mouse click. If all 9 potential numbers are shown initially in a grid, once we can rule out any potential numbers from a square we could remove them leaving only the numbers which are still available to be picked.
This sounds like a good plan to me.
Therefore the aim of this stage is to get the numbers 1-9 all nicely placed in each small grid. There are 81 grids so we need to do this for each of the grids.
To place the numbers 1-9 in one of the small grids, it would be best to split them into 3 rows of 3 as so:
123
456
789
To position each of these numbers it sounds as though we need to split each cell so it is made up of 9 smaller squares. First of all add an extra global variable which will help us with that. As this is to determine the space for the numbers lets call this NUMBERSIZE. Therefore below the line
CELLSIZE = SQUARESIZE / 3 # Size of a cellAdd the following line:
NUMBERSIZE = CELLSIZE /3 # Position of unsolved numberThe size for each number is 1/3 of each CELLSIZE.
As we are now in effect dividing the window size by three, then three again (total of 9) and three again (total of 27) and all our global variables are integers (whole numbers) we need ideally want our window size to be a multiple of 3, 9 and 27. Therefore make the window size = 81. This avoids a bug later which I found to be caused by rounding errors!
WINDOWSIZE = 81Before we get carried away with how we are going to display all the numbers, we need a method of storing the remaining numbers for each of the 81 cells. We know there are 9 cells across and 9 cells down, so we can uniquely identify each one by a simple co-ordinate system i.e. (0,0),(0,1),(0,2)......(8,7),(8,8)
The best way is to use a Python Dictionary. Dictionaries have keys and values. By knowing the key you can find the associated value.
If we use the co-ordinates as a key in a dictionary, we can have a list of the potential numbers as the value associated with that key. So for instance the first cell will have the Key (0,0) and the Value [1,2,3,4,5,6,7,8,9] as we have no solved parts of the Sudoku yet. In fact all the Values in the dictionary will be [1,2,3,4,56,7,8,9] to start.
As we only need to create the dictionary once, lets create a function to do this called initiateCells()
Here is the full function first of all then we will break it down line by line.
def initiateCells():
    currentGrid = {}
    fullCell = [1,2,3,4,5,6,7,8,9]
    for xCoord in range(0,9):
        for yCoord in range(0,9):
            currentGrid[xCoord,yCoord] = list(fullCell) # Copies List
    return currentGrid
Place this function below the drawGrid function.
The first line is creating the name of the function.
def initiateCells():The second line creates a blank dictionary called currentGrid.
currentGrid = {}The third line creates a list called fullCell populated with [1,2,3,4,5,6,7,8,9]
fullCell = [1,2,3,4,5,6,7,8,9]The fourth line runs through the x co-ordinates from 0 up to, but not including 9 i.e. the numbers 0,1,2,3,4,5,6,7,8
for xCoord in range(0,9):For each of the numbers from xCoord the fifth line runs through 9 numbers for yCoords, again from 0 up to, but not including 9.
for yCoord in range(0,9):The above two lines have been quite clever in generating 81 co-ordinates from (0,0) up to (8,8) So for each of these 81 co-ordinates we now create a new item in the dictionary using the co-ordinate as the key and the list in the fullCell as the associated value. list(fullCell) ensures the list is copied, so each co-ordinate has its own list.
currentGrid[xCoord,yCoord] = list(fullCell) # Copies ListFinally we return the fully populated dictionary called currentGrid.
We should call the initiateCells function from our main function so we can use the information we have just created.
Add the following line as shown below.
    DISPLAYSURF.fill(WHITE)

    currentGrid = initiateCells()
This creates a Dictionary in our main function called currentGrid and populates it with what has been returned from the initiateCells function.
Now we have all the data for each of the cells we need to somehow display that on our grid.
To do this we will write a function which takes the information in currentGrid. We will call the function displayCells. This should be added beneath the initiateCells function.
Here is the function and I will then break it down line by line.
# Takes the remaining numbers and displays them in the cells.
def displayCells(currentGrid):
    # Create offset factors to display numbers in right location in cells.
    xFactor = 0
    yFactor = 0
    for item in currentGrid: # item is x,y co-ordinate from 0 - 8
        cellData = currentGrid[item] # isolates the numbers still available for that cell
        for number in cellData: #iterates through each number
            if number != ' ': # ignores those already dismissed
                xFactor = ((number-1)%3) # 1/4/7 = 0 2/5/8 = 1 3/6/9 =2
                if number <= 3:
                    yFactor = 0
                elif number <=6:
                    yFactor = 1
                else:
                    yFactor = 2
                #(item[0] * CELLSIZE) Positions in the right Cell
                #(xFactor*NUMBERSIZE) Offsets to position number
                populateCells(number,(item[0]*CELLSIZE)+(xFactor*NUMBERSIZE),(item[1]*CELLSIZE)+(yFactor*NUMBERSIZE))
    return None
The first line
def displayCells(currentGrid):Tells us that we are creating a function called displayCells. However more importantly it is also saying we are taking the data in currentGrid and passing this into the function for us to use.
We know that for each of our numbers from 1-9 that we want to display in the grid, we want them in a different location. Otherwise they would all be on top of each other, and unreadable. The next two lines create an offset factor, which is really a co-ordinate, so we can offset the numbers from each other. We will need one for x and one for y.
# Create offset factors to display numbers in right location in cells.
    xFactor = 0
    yFactor = 0
The line
for item in currentGrid: # item is x,y co-ordinate from 0 - 8goes through each of the items we have in currentGrid one at a time.
This is iterating through the Keys in the dictionary, which in this case are the co-ordinates. We want to know what numbers from 1-9 are still available for those co-ordinates, so the next line draws out that information and stores it in a variable called cellData.
cellData = currentGrid[item] # isolates the numbers still available for that cellLets look at the next few lines together.
        for number in cellData: #iterates through each number
            if number != ' ': # ignores those already dismissed
                xFactor = ((number-1)%3) # 1/4/7 = 0 2/5/8 = 1 3/6/9 =2
                if number <= 3:
                    yFactor = 0
                elif number <=6:
                    yFactor = 1
                else:
                    yFactor = 2
The first of these lines iterates through each number from 1-9 that we have stored in the cellData.
The second line is planning for the future. It says that as we go through the numbers 1-9, if the current number we are up to is NOT a space (remember != means not equal to), which is signified by a ' ', we should carry on with the next few few lines of code.
Why would any of the numbers be a space and not a number?
Well as we solve our Sudoku, we are going to have to keep track of which numbers are no longer available to us. If a number is no longer available for that cell, we will replace it with a space. So this line is telling us to ignore the spaces.
For each of our numbers we want to be able to put it in the right place in the grid. We decided earlier we would like them to be shown as
1 2 3
4 5 6
7 8 9
If we treat each of these positions as co-ordinates we see that:
numbers 1,4 & 7 have x co-ordinate 0
numbers 2,5 & 8 have x co-ordinate 1
numbers 3,6 & 9 have x co-ordinate 2
It is these co-ordinates that we will store in our xFactor and yFactor variables.
The line
xFactor = ((number-1)%3) # 1/4/7 = 0 2/5/8 = 1 3/6/9 =2
does exactly that and stores the number 0,1 or 2 in the variable xFactor.
So how does this work?
Well the modulus returns the remainder of one number divided by another.
An example is 10 divided by 3 is 3.3333 or we could say 10 divided by 3 is 3 three whole times, with 1 remainder. therefore 10%3 = 1 as it is returning the remainder.
Lets calculate the value of a number%3 for numbers from 0-10. You can try this in a python interactive shell if you want to test it out.
0%3 = 0
1%3 = 1
2%3 = 2
3%3 = 0
4%3 = 1
5%3 = 2
6%3 = 0
7%3 = 1
8%3 = 2
9%3 = 0
10%3 = 1
We need number 1, 4 and 7 to equal 0. This shows numbers 0, 3 and 6 = 0. So if we minus a 1 off our number before dong the modulus against a 3 this will give us the right value for XOffset. This is why we have (number-1)%3
The lines for yFactor are much easier to understand, as the code is almost self explanatory.
                if number <= 3:
                    yFactor = 0
                elif number <=6:
                    yFactor = 1
                else:
                    yFactor = 2
If the number is 3 or less, then y factor is 0.
Else if it 6 or less then it is a 1.
Else it is a 2.
We are now at the stage in the function where for each number we have its position within the cell. What we have to do is combine this information with the information about which cell we are working in so we can plot each number in the right place.
We will create a separate function, called populateCells in a minute to print the information in the right place. The data we want to pass into this function is the number we want to print and the x and y co-ordinates on the screen where we want to print it.
Well we know the number is stored in the variable 'number', so that is easy to pass into the function.
The x co-ordinate is made up of two parts. First we need to know the position of the cell we are working in, and secondly where in that cell our number should fit.
Our program is currently in a couple of for loops. The outer one is
For item in currentGrid
Where item becomes the co-ordinates of each cell as we iterate through them. Therefore the x co-ordinate multiplied by the size of the cell, which we have stored in a global variable CELLSIZE, should locate our cell.
(item[0] * CELLSIZE)
Now we need to add onto this the location we are in the cell. Well we have just determined the xFactor so if we multiply that by the global variable NUMBERSIZE, that should give the additional offset data within the cell.
(xFactor*NUMBERSIZE)
These two added together should give the x co-ordinate of the number.
(item[0]*CELLSIZE)+(xFactor*NUMBERSIZE)
Similar deductions show that the y co-ordinate can be determined from.
(item[1]*CELLSIZE)+(yFactor*NUMBERSIZE)
So that is how we arrive at the line
                #(item[0] * CELLSIZE) Positions in the right Cell
                #(xFactor*NUMBERSIZE) Offsets to position number
                populateCells(number,(item[0]*CELLSIZE)+(xFactor*NUMBERSIZE),(item[1]*CELLSIZE)+(yFactor*NUMBERSIZE))
The two lines with a # are just to act as a reminder of what the different aspects refer to, which will help if we are reading our code in the future.
Finally we type
return NoneNow we have passed the number, and co-ordinates into the function populateCells, we need to write that function to print the data in the right location. However before we do that we need to specify a font in the main section of the program.
Under the pygame.display.set_caption line add in the following three lines
    pygame.display.set_caption('Sudoku Solver')

    global BASICFONT, BASICFONTSIZE
    BASICFONTSIZE = 15
    BASICFONT = pygame.font.Font('freesansbold.ttf', BASICFONTSIZE)
These three lines set the size and type of font, they also make the data global variables for us to use elsewhere.
Right onto the populateCells function! The completed function is as follows.
# writes cellData at given x, y co-ordinates
def populateCells(cellData, x, y):
    cellSurf = BASICFONT.render('%s' %(cellData), True, LIGHTGRAY)
    cellRect = cellSurf.get_rect()
    cellRect.topleft = (x, y)
    DISPLAYSURF.blit(cellSurf, cellRect)
I will not go into much detail on this function as they are pygame commands to allow us to print. The important thing is we are printing the number we have passed into it at the co-ordinates given, using the colour LIGHTGRAY, and the font BASICFONT.
The final thing we want to do is to call the displayCells function from our main function and populate it with the information we generated earlier from our initiateCells function. This will make sure our program makes use of the functions we have just written. Therefore add the following line into the main function below the currentGrid = initiateCells() line.
    currentGrid = initiateCells()
    displayCells(currentGrid)
Press F5 to run and test the program. Do you see the picture shown at the top of this section?
Sudoku Step 3 Source Code
Step 4 - Add in the ability to select different numbers with the mouse
The purpose of this section is to highlight the number the mouse is hovering over, and to report back the location to the user.

The first thing we want to do is to create a few variables to store the co-ordinates of the mouse pointer, and to store if the mouse has been clicked or not. These variables should be put into the main function as shown.
Now we are going to modify the While loop in the main function so it will recognise mouse events.DISPLAYSURF = pygame.display.set_mode((WINDOWWIDTH,WINDOWHEIGHT)) mouseClicked = False mousex = 0 mousey = 0
At the moment the loop is as follows:
    while True: #main game loop
        for event in pygame.event.get():
            if event.type == QUIT:
                pygame.quit()
                sys.exit()

        pygame.display.update()
        FPSCLOCK.tick(FPS)
This loop should become:
    while True: #main game loop
        mouseClicked = False
        for event in pygame.event.get():
            if event.type == QUIT:
                pygame.quit()
                sys.exit()
            # mouse movement commands
            elif event.type == MOUSEMOTION:
                mousex, mousey = event.pos

            #Mouse click commands
            elif event.type == MOUSEBUTTONUP:
                mousex, mousey = event.pos
                mouseClicked = True

        if mouseClicked == True:

            print mousex
            print mousey

        # repaints screen
        DISPLAYSURF.fill(WHITE)
        displayCells(currentGrid)
        drawGrid()
        # call function to draw box
        drawBox(mousex,mousey)

        pygame.display.update()
        FPSCLOCK.tick(FPS)
So what has changed and why?
First of all we have added mouseClicked = False to the start of the main loop. This makes sure that we know what the mouseClicked variable is set to at the start of the function as it is always reset.
The next few lines don't change as they are about exiting the program correctly.
After the if command we have the following lines
            # mouse movement commands
            elif event.type == MOUSEMOTION:
                mousex, mousey = event.pos
This is simply saying that if we have not quit, then check to see if the mouse moves. If it does store the co-ordinates in the variables mousex and mousey which we created and set to 0 earlier.
We then add another elif command.
            #Mouse click commands
            elif event.type == MOUSEBUTTONUP:
                mousex, mousey = event.pos
                mouseClicked = True
This says if we have not quit or moved the mouse, check if we have clicked the mouse. Again store the position of where this happened in mousex and mousey, but also change mouseClicked to True.
A quick note on MOUSEBUTTONUP, you can use MOUSEBUTTONDOWN. Its probably quite obvious, but MOUSEBUTTONUP is where you release the mouse button and MOUSEBUTTONDOWN is where you press the button down.
Both will work equally well.
We then leave the event for loop and check to see if the mouse was clicked. If it was we print both the x and y co-ordinates.
        if mouseClicked == True:

            print mousex
            print mousey
Now we will repaint the screen. By repainting it white, printing the text and the drawing the grid as follows.
        # repaints screen
        DISPLAYSURF.fill(WHITE)
        displayCells(currentGrid)
        drawGrid()
Actually we use these commands a little higher up, but they are not as neat as here, so lets tidy them up while we are at it.
Under where we have created BASICFONT re-arrange
    DISPLAYSURF.fill(WHITE)

    currentGrid = initiateCells()
    displayCells(currentGrid)

    drawGrid()
To
    currentGrid = initiateCells() #sets all cells to have number 1-9

    # repaints screen
    DISPLAYSURF.fill(WHITE)
    displayCells(currentGrid)
    drawGrid()
It just keeps our code consistent and a little neater looking. I have also added in a comment explaining the first of those lines.
The final change we have made is to call a function drawBox, which is to draw a box around the number the mouse is highlighting.
        # call function to draw box
        drawBox(mousex,mousey)
After adding this line add the following function below the populateCells function.
def drawBox(mousex, mousey):

    boxx =((mousex*27) / WINDOWWIDTH) * (NUMBERSIZE ) # 27 number of squares
    boxy =((mousey*27) / WINDOWHEIGHT) * (NUMBERSIZE ) # 27 number of squares
    pygame.draw.rect(DISPLAYSURF, BLUE, (boxx,boxy,NUMBERSIZE,NUMBERSIZE), 1)
So what does this function do? Well as you can see it takes the values of mousex and mousey, which hold the co-ordinates of the mouse position.
The first two lines in this function are similar, one for x and one for y. They take the co-ordinates of where the mouse is and converts them to the start of the box for the number which you are hovering over.
The final line in this function draws a rectangle around the number the mouse is hovering over. This is a pygame command for drawing a rectangle.
DISPLAYSURF is the surface you are drawing the rectangle on.
BLUE is the colour of the rectangle.
boxx / boxy is the start co-ordinate in x/y
NUMBERSIZE/NUMBERSIZE is not the co-ordinates for the end of the box, but the size of the box in x/y.
Notice the use of brackets around the previous 4 items.
Finally the 1 signifies the width of the line you would like to draw.
I have stated we want the box to be BLUE. We better add a blue colour to our colour global variables at the top of the program.
# Set up the colours
BLACK     = (0  ,0  ,0  )
WHITE     = (255,255,255)
LIGHTGRAY = (200,200,200)
BLUE      = (0  ,0  ,255)
Ok that's this stage finished! If you run the program and move your mouse over the grid you should see a blue box around the number your mouse is hovering over. As you click on the number do you notice the co-ordinates are printed out in the shell?

Sudoku Step 4 Source Code
Step 5 - Update the screen as numbers are selected
The purpose of this section is to take the location of the mouse as its button is clicked and use it to select that number in the grid.

In the previous section we drew a square around the number the mouse was currently over, and when the mouse was clicked we reported back the co-ordinates of its location. If you remember back to earlier in our program we stated that each cell had 9 numbers (1-9) which could be selected. These could reduce in number by some numbers becoming a space to signify these were no longer an option ' '. These will reduce as the Sudoku is solved. If the user were to click on a number, it would mean that number has been selected as right. Therefore all other numbers in that cell can be eliminated i.e. made into a space ' '.
First things first. To display the number we have selected we will display it as green. Therefore add a GREEN to your list of global variables.
# Set up the colours
BLACK     = (0  ,0  ,0  )
WHITE     = (255,255,255)
LIGHTGRAY = (200,200,200)
BLUE      = (0  ,0  ,255)
GREEN     = (0  ,255,0  )
Whereas the current font takes up a 1/9 of the cell we will also want to display a larger font to take up the whole of the cell. So add a large font to the location where you define the BASICFONT.
At the moment when we click the mouse we print out the position of x and y. Lets change this so it calls a function called displaySelectedNumberglobal BASICFONT, BASICFONTSIZE, LARGEFONT, LARGEFONTSIZE BASICFONTSIZE = 15 LARGEFONTSIZE = 55 BASICFONT = pygame.font.Font('freesansbold.ttf', BASICFONTSIZE) LARGEFONT = pygame.font.Font('freesansbold.ttf', LARGEFONTSIZE)
So replace the print statements with a call to the function.
        if mouseClicked == True:

            print mousex
            print mousey
Should be replaced with
        if mouseClicked == True:
            # allow number to be selected
            currentGrid = displaySelectedNumber(mousex, mousey, currentGrid)
This function requires the x and y co-ordinates and the state of the current grid. So we are passing that information into the function.
Now we should write the function displaySelectedNumber. The purpose of this function is to identify the number we have selected and to update the dictionary which holds the information regarding the current state of the grid. Here is the completed function and we will run through it line by line.
def displaySelectedNumber(mousex, mousey, currentGrid):
    xNumber = (mousex*27) / WINDOWWIDTH # xNumber in range 0 - 26
    yNumber = (mousey*27) / WINDOWWIDTH # yNumber in range 0 - 26
    #Determine a 0,1 or 2 for x and y
    modXNumber = xNumber % 3
    modYNumber = yNumber % 3
    if modXNumber == 0:
        xChoices = [1,4,7]
        number = xChoices[modYNumber]
    elif modXNumber == 1:
        xChoices = [2,5,8]
        number = xChoices[modYNumber]
    else:
        xChoices = [3,6,9]
        number = xChoices[modYNumber]
    # need to determine the cell we are in
    xCellNumber = xNumber / 3
    yCellNumber = yNumber / 3

    # gets a list of current numbers
    currentState = currentGrid[xCellNumber,yCellNumber]
    incNum = 0

    while incNum < 9:
        # if NOT number selected
        if incNum+1 != number:
            currentState[incNum] = ' ' # make ' '
        else:
            currentState[incNum] = number # make = number
        #update currentGrid
        currentGrid[xCellNumber,yCellNumber] = currentState
        incNum += 1
    return currentGrid
The first part of the function is to identify the number we have chosen.
The first line is obviously stating the function name, and the fact it is expecting mousex, mousey and currentGrid to be passed into it.
def displaySelectedNumber(mousex, mousey, currentGrid):The next two lines
    xNumber = (mousex*27) / WINDOWWIDTH # xNumber in range 0 - 26
    yNumber = (mousey*27) / WINDOWWIDTH # yNumber in range 0 - 26
return a number from 0 - 26, which is 27 numbers, to cover all the potential numbers in cells in x and y. It is a similar function to the function we used in the drawBox function to determine boxx and boxy. However we are only interested in which number we have selected and not its location, so we don't need to multiply by NUMBERSIZE.
    #Determine a 0,1 or 2 for x and y
    modXNumber = xNumber % 3
    modYNumber = yNumber % 3
These two lines take the modulus of the numbers (from 0-26) which we have just determined. This will store either a 0,1 or a 2 depending on the result of the modulus. This is carried out for the x and y axis. The two numbers modXNumber and modYNumber are in effect co-ordintes to determine which number in the cell we have chosen. Remember the numbers are in the format
123
456
789
The next few lines cover an if ... else statement. These help determine which number has been clicked on. We have carried out a similar process in our displayCells function. However in that function we only needed to determine the co-ordinates of the number within a cell. Now we need to determine the actual number we have clicked on no matter where we clicked in the screen.
The results for modXNumber for various xNumbers will be
0 % 3 = 0
1 % 3 = 1
2 % 3 = 2
3 % 3 = 0
4 % 3 = 1
5 % 3 = 2
etc etc
    if modXNumber == 0:
        xChoices = [1,4,7]
        number = xChoices[modYNumber]
The if statement says that if the modXNumber is 0, then the options can be narrowed down to a 1,4 or a 7. We store these in a list called xChoices.
So we have sorted out which column we are in, what about the row? Well we have modYNumber. Again the result of yNumber % 3 will be 0,1,2,0,1,2 etc as shown above. We know if modYNumber is 0 then the number has to be in the top row (1,2 or 3). If its a 1 it will be in the middle row (4,5 or 6) or a 2 in the bottom row(7,8 or 9).
But we have already used modXNumber to narrow down the options so there is one potential number from the top row, one from the middle and one from the bottom. There are stored in a list with the top row in the 1st position i.e. xChoices[0]
Therefore the line
number = xChoices[modYNumber]uses modYNumber to determine which number from the list we are interested in. Which will be the number we clicked on.
The remainder of the If... Else statement covers the other rows
    elif modXNumber == 1:
        xChoices = [2,5,8]
        number = xChoices[modYNumber]
    else:
        xChoices = [3,6,9]
        number = xChoices[modYNumber]
So we have completed the first part of the function and determined which number we have clicked on.
Now lets determine which cell we are in.
The first two lines in this function told us with of the 27 potential numbers in x we had clicked on and the same for y. Each cell has three numbers, so if we divide the number we have clicked on by three this will give us which cell we are in.
    # need to determine the cell we are in
    xCellNumber = xNumber / 3
    yCellNumber = yNumber / 3
Now we will interrogate that cell and check what numbers are currently stored in there. We will store the numbers in a list called currentState using the line
    # gets a list of current numbers
    currentState = currentGrid[xCellNumber,yCellNumber]
What we are going to do now is go through each of the numbers in the cell. If its not the number we have picked, we will set it to a space ' '. If it is the number we have chosen, that becomes the only remaining number in the list for that cell.
First of all we create a number to increment each time, called incNum and set this to 0. We will increase this each time and check if it matches against the number we picked. This will also help us identify which item in the list we can set to ' '.
First the number we will increment each time.
incNum = 0Now we start a while loop which will run through the numbers 0 - 8.
The next two lines
        # if NOT number selected
        if incNum+1 != number:
            currentState[incNum] = ' ' # make ' '
States if the incNum + 1 is not equal to the number (inc runs from 0-8, our numbers 1-9, so we need to add 1 to it) we have selected, we should make that number in the list a space ' '.
We then say else, which covers all cases where they are the same.
        else:
            currentState[incNum] = number # make = number
Perfect, there should only be one number, the one we have chosen, in the currentState list.
Lets then update the dictionary, currentGrid with this information
        #update currentGrid
        currentGrid[xCellNumber,yCellNumber] = currentState
And finally don't forget to increase incNum, or else we will be stuck in the while loop forever.
incNum += 1Until returning the currentGrid
return currentGridBefore running your program there is just one thing left to do. In our populateCells function which draws the numbers in the grid, all the numbers are defined as having the same size / colour font. We have not used our new larger font yet. How can we tell if the font should be large or small? Well if there in only one number, and 8 spaces in that cell, then the number should use the large font, otherwise it should still be on the small font.
In our displayCells function change the line which calls the populateCells function from
                #(item[0] * CELLSIZE) Positions in the right Cell
                #(xFactor*NUMBERSIZE) Offsets to position number
                populateCells(number,(item[0]*CELLSIZE)+(xFactor*NUMBERSIZE),(item[1]*CELLSIZE)+(yFactor*NUMBERSIZE))
to
                #(item[0] * CELLSIZE) Positions in the right Cell
                #(xFactor*NUMBERSIZE) Offsets to position number
                if cellData.count(' ') < 8:
                    populateCells(number,(item[0]*CELLSIZE)+(xFactor*NUMBERSIZE),(item[1]*CELLSIZE)+(yFactor*NUMBERSIZE),'small')
                else:
                    populateCells(number,(item[0]*CELLSIZE),(item[1]*CELLSIZE),'large')
As before this calls the populate cells, but differentiates if there in only a single number remaining, meaning the large font should be used, or multiple numbers, meaning the small font should be used. It checks this by using the line
if cellData.count(' ') < 8:Which counts the number of spaces, a very useful command!
Now both options call the populateCells, but they also send a string saying 'small' or 'large' to the function, so lets modify that function to accept this.
# writes cellData at given x, y co-ordinates
def populateCells(cellData, x, y,size):
    if size == 'small':
        cellSurf = BASICFONT.render('%s' %(cellData), True, LIGHTGRAY)
    elif size == 'large':
        cellSurf = LARGEFONT.render('%s' %(cellData), True, GREEN)

    cellRect = cellSurf.get_rect()
    cellRect.topleft = (x, y)
    DISPLAYSURF.blit(cellSurf, cellRect)
The first change is to the header so also accept size.
def populateCells(cellData, x, y,size):We then change the cellSurf depending on which font we are using. The rest of the function can remain the same.
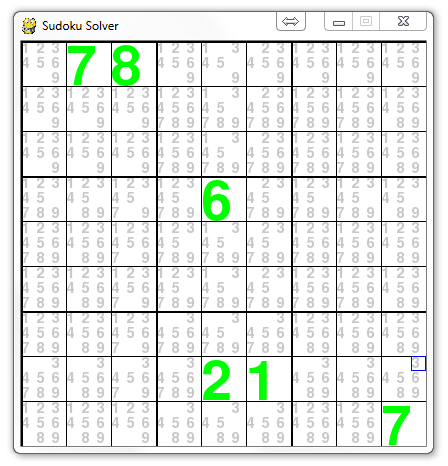
It's time to test your program out. Save and run your program and see what clicking on different cells achieves. Hopefully you will get a similar result to the picture at the top of this section!
Sudoku Step 5 Source Code
Step 6 - Implement the first method of solving Sudoku
Most of the hard work has been done, so now we can get on with the fun part of writing some algorithms to solve the Sudoku! The first thing we will do is to ensure when a number is clicked on, and selected, that number becomes unavailable for all other cells in the same Row, Column, and group of 9 cells that make a larger square.
Let's link to all our Sudoku Solving algorithms in one function called solveSudoku. The first thing we will need to do then is call our solveSudoku function from our main function.
We want to ensure this is called from within our loop, so it is checked continuously, therefore place a call to this function under the mouseClicked == True section as shown below.
        if mouseClicked == True:
            # allow number to be selected
            currentGrid = displaySelectedNumber(mousex, mousey, currentGrid)

        solveSudoku(currentGrid)
Lets go and write the new function below all the other functions we have written. Here is the function with a description to follow.
The first line is defining the name of the function and tells the function that we are passing currentGrid into it.def solveSudoku(currentGrid): for item in currentGrid: # item is x,y co-ordinate from 0-8 cellData = currentGrid[item] # isolates the numbers still available for that cell if cellData.count(' ') == 8: # only look at those with one number remaining for number in cellData: # Determine the number there if number != ' ': updateNumber = number currentGrid = removeX(currentGrid, item, updateNumber) currentGrid = removeY(currentGrid, item, updateNumber) currentGrid = removeGrid(currentGrid, item, updateNumber) return currentGrid
def solveSudoku(currentGrid):We then go into a for loop, which runs through each of the items in the currentGrid dictionary.
for item in currentGrid: # item is x,y co-ordinate from 0-8
However this runs through the keys and not the values, so for each cell lets look at what numbers are still available in that cell.
cellData = currentGrid[item] # isolates the numbers still available for that cellThe next line looks at the cells which only have one number remaining. We can only start to remove numbers from the other cells if we have a cell with only one number in it.
if cellData.count(' ') == 8: # only look at those with one number remainingWe have used this line before to count the number of spaces left in our list, if there are 8 spaces there must only be one number remaining.
Now we know there is only one number left the next three lines work out which number is left and stores that number in a variable called updateNumber.
            for number in cellData: # Determine the number there
                if number != ' ':
                    updateNumber = number
Now we have isolated a cell with a single number in there, and have stored that single number, we can now check to see if any of the other cells in the same row, column or square (3x3 cells separated by the darker lines) have that number in, and if so we can remove it from their list of potential numbers.
We will have to employ different methods for checking the row, the column and the square, so lets write a separate function for each of these three.
The next three lines call the three separate functions one at a time. For each of the functions currentGrid, item and updateNumber are passed into the functions. As these update the grid we will take the result from each of the functions and make currentGrid equal to what we return. These are followed by the return statement.
Let us start by writing the removeX function. This looks at all the other cells in the same row as the cell we know only has one number, and removes that number from each of them.currentGrid = removeX(currentGrid, item, updateNumber) currentGrid = removeY(currentGrid, item, updateNumber) currentGrid = removeGrid(currentGrid, item, updateNumber) return currentGrid
We should write this function below the solveSudoku function.
Here is the function in its entirety, with a line by line explanation following.
def removeX(currentGrid, item, number):
    for x in range(0,9):
        if x != item[0]:
            currentState = currentGrid[(x,item[1])]
            currentState[number-1] = ' '
            currentGrid[(x,item[1])] = currentState
    return currentGrid
The first line is defining the name of the function and the data we are passing into the function. currentGrid which shows the state of the whole grid, the item, which is the individual cell we are looking at which only has one number in it, and the number itself.
def removeX(currentGrid, item, number):Now we want to run through the numbers 0-8. We know there are 9 cells in the x axis, so if we know the cell we are currently in we can quickly work out the other cells we need to modify.
for x in range(0,9):We know the cell we passed into the function only has one number, so we do not need to modify that. The next line ignores our current cell.
if x != item[0]:
For each of the cells in the same row, we copy the list of numbers from that cell into a variable called currentState
currentState = currentGrid[(x,item[1])]
We then modify the currentState list, replacing the number we know should not be in the list by a space.
currentState[number-1] = ' 'Remember when looking at a list the first number in the list is list[0], that is why we have to minus 1 from the number. The first number in our list is a 1, which is in position 0 in the list.
We then update the information in our dictionary to reflect the changes we have made.
currentGrid[(x,item[1])] = currentStateThen we return the data in currentGrid which has the updated version of the Sudoku grid.
return currentGridWe now write the create removeY function. This now looks at all the other cells in the same column as the cell we know only has one number, and removes that number from each of them.
def removeY(currentGrid, item, number):
    for y in range(0,9):
        if y != item[1]:
            currentState = currentGrid[(item[0],y)]
            currentState[number-1] = ' '
            currentGrid[(item[0],y)] = currentState
    return currentGrid
The function removeY is very similar to removeX. However this time we know the column we want to look at and modify so the x value, defined by item[0], stays the same, but we iterate through different y values to allow us to modify the whole column.
Finally we have to look at modifying all the items in the same square. The square is one of the 9 larger squares in a Sudoku made up of nine smaller squares. This is a little more complex so will need some explanation. While the principle is the same a little more work has to be done to determine which cells need modification. The function is as follows.
The first line obviously defines the name of the function and the variables passed into it.def removeGrid(currentGrid, item, number): if item[0] < 3: xGrid = [0,1,2] elif item[0] > 5: xGrid = [6,7,8] else: xGrid = [3,4,5] if item[1] < 3: yGrid = [0,1,2] elif item[1] > 5: yGrid = [6,7,8] else: yGrid = [3,4,5] #iterates through each of the nine numbers in the grid for x in xGrid: for y in yGrid: if (x,y) != item: # for all squares except the one containing the number currentState = currentGrid[(x,y)] # isolates the numbers still available for that cell currentState[number-1] = ' ' # make them blank. currentGrid[(x,y)] = currentState return currentGrid
def removeGrid(currentGrid, item, number):We then want to find out the co-ordinates which make up the nine cells defining the larger square we want to modify. Starting with the x values.
    if item[0] < 3:
        xGrid = [0,1,2]
    elif item[0] > 5:
        xGrid = [6,7,8]
    else: xGrid = [3,4,5]
This code looks at the item we have passed into it. If the x component of the co-ordinate is less than 3, we know we want to modify only items which have x co-ordinates 0,1 or 2 in our 9x9 grid.
If it is greater than 5, we only want to look at items in position 6,7 & 8, which is the last column of larger squares.
Otherwise we know that it must sit in the middle column in 3,4 & 5
We repeat the process for the y values to determine the row.
    if item[1] < 3:
        yGrid = [0,1,2]
    elif item[1] > 5:
        yGrid = [6,7,8]
    else: yGrid = [3,4,5]
So the values in xData and yData will now show us the co-ordinates of all the items in the larger square, which we need to modify.
Its now a case of iterating through each of these using a loop within a loop, so we run through all 9 cells within the square.
    for x in xGrid:
        for y in yGrid
We check to make sure that as we iterate through the cells we ignore the cell which we are investigating.
if (x,y) != item: # for all squares except the one containing the numberFor each cell iteration we store the numbers available in a list called currentState.
currentState = currentGrid[(x,y)] # isolates the numbers still available for that cellAs with the removeX and removeY functions we change the number we are trying to remove from the cell and replace it with a ' ' .
currentState[number-1] = ' 'Then we update the information in the dictionary to reflect the changes we have just made
currentGrid[(x,y)] = currentStateThen we return the modified dictionary.
return currentGridPress F5 to save and run the program and have a good click around to ensure the program does what you expect it to. By clicking on a number 5 for instance all the number 5's in the row, column and the square are also removed, which is perfect...
Sudoku Step 6 Source Code
Step 7 - Allowing correction of mistakes
however it's not...
What if we were to change our mind? Say we clicked on a 5 by error, and then in the same square we clicked on the location where there should be a 6. We see that all the 5's disappear from the same row, column and square as expected. When we click on where the 6 should be, all the 6's disappear. But the 5's should re-appear. But they don't. By changing our mind we should have only selected one number, but the history of the first number we clicked on is still reflected in our grid. The purpose of this stage is to correct that before we implement any more Sudoku solving algorithms.

We know from earlier in our program that when we click the mouse we call the function displaySelectedNumber(). We also know that the program is continuously looping through the main function, and within that function it is calling other functions including solveSudoku(). solveSudoku() looks to see what cells are known and solves all other cells depending on that information.
If after a mouse click we give displaySelectedNumber() a chance to modify the cells to match our latest click, and then call a function to reset all cells which were not solved (i.e. had more than one potential number remaining) so they once again have all 9 numbers available. When our program gets back to the main loop it would then run solveSudoku(), and all cells would be updated to reflect the cells which are resolved to only having one number.
Lets program that.
First thing is we want to give the function displaySelectedNumber() a chance to do its thing. We also know displaySelectedNumber only runs when a mouse is clicked, which is the only time we would want to be updating the cells to reflect a change. Its obvious there can only be a change when the mouse is clicked.
So at the end of displaySelectedNumber() add the following line just before the return statement.
incNum += 1
currentGrid = refreshGrid(currentGrid) return currentGrid
Now below this function we will write the refreshGrid function. Obviously passing currentGrid into it as we will want to be updating this dictionary.
The function in its entirety is as follows.
# If a number is selected, and then changed the grid needs to be refreshed.
def refreshGrid(currentGrid):
    fullCell = [1,2,3,4,5,6,7,8,9]
    for xCoord in range(0,9):
        for yCoord in range(0,9):
            cellData = currentGrid[xCoord, yCoord]
            if cellData.count(' ') < 8:
                currentGrid[xCoord,yCoord] = list(fullCell) # Copies List
    return currentGrid
After declaring the function name, and stating that we are passing currentGrid into the function, a list is created which holds the information we will use to reset the cell.
def refreshGrid(currentGrid):
fullCell = [1,2,3,4,5,6,7,8,9]Now we iterate through all the cells using the next two lines.
    for xCoord in range(0,9):
        for yCoord in range(0,9):
Then take the value from the currentGrid dictionary matching the key[xCoords, yCoord], and store it in the variable cellData
cellData = currentGrid[xCoord, yCoord]If cellData has less than 8 spaces in it, i.e. we have not yet singled this list down to a single number.
if cellData.count(' ') < 8:We reset it by storing the information from fullCell as the value for the key associated with the cell in the dictionary. list fullCell ensures the list is copied.
currentGrid[xCoord,yCoord] = list(fullCell) # Copies ListFinally we return the new currentCell
return currentGridNow if you save the program and test it you should see that if you click one number, and then correct it all the other cells update to match the correction.
Sudoku Step 7 Source Code
Step 8 - Implement a second method of solving Sudoku
The final method of solving a Sudoku that we will implement in this blog is to check the rows, column and the squares to see if a number appears in only one of those group of cells. If it does, even if other numbers are still available in that cell, we can discount those and determine the number in the cell is the number that only appears once.

The first thing we will want to do is to call the three functions which will do the hard work from our solverSudoku function.
For our previous three solving algorithms explained in step 6 we went through each of the cells in the grid and determined which only had one number in them. We then sent information about that cell, the number and the overall grid into the three solving functions (removeX, removeY & removeGrid). However for this next algorithm we don't want to narrow down the cells, or supply a number. We only want to supply the data in currentGrid, and return it if modified. We will call three functions to check if there is only one number in x (the row), y (the column) or the Square of 9 cells. At the end of the solveSudoku function add the following three lines just before return currentGrid. Note they are not indented like the previous function calls.
    # determine if any cells contain a number only used once in X/Y/Grid
    currentGrid = onlyNinX(currentGrid)
    currentGrid = onlyNinY(currentGrid)
    currentGrid = onlyNinGrid(currentGrid)
    return currentGrid
We will write the onlyNinX(currentGrid) function first of all.
# Go through each cell in each row # check if it contains a number which is not in the rest of the row. def onlyNinX(currentGrid): # check all items in currentGrid list for item in currentGrid: # create two empty lists allNumbers = [] currentNumbers = [] # determine all numbers remaining in the row - store in allNumbers for xRange in range(0,9): for rowNumbers in currentGrid[(xRange,item[1])]: if rowNumbers != ' ': allNumbers.append(rowNumbers) # determine numbers remaining in individual cell being looked at - store in currentNumbers for cellNumbers in currentGrid[item]: if cellNumbers != ' ': currentNumbers.append(cellNumbers)This is quite a large function, but don't panic! It is not complicated. As we run through the code it will become obvious what we are doing.# look at numbers remaining in a cell. Check if they only appear in the row once. if len(currentNumbers) > 1: for checkNumber in currentNumbers: if allNumbers.count(checkNumber) == 1: # at this stage we know checkNumber appears only once, so we now update grid currentState = currentGrid[item] for individualNumber in currentState: if individualNumber != checkNumber and individualNumber != ' ': currentState[individualNumber-1] = ' ' currentGrid[item] = currentStatereturn currentGrid
First of all we need to go through each of the cells in our Sudoku one by one. This allows us to check the row associated with that cell and check if that cell has a number which is not in the rest of the row. We have done this a lot already.
    # check all items in currentGrid list
    for item in currentGrid:
We will want to keep track of all the numbers in the row and all the numbers in the cell. So we create two lists to store this information.
        # create two empty lists
        allNumbers = []
        currentNumbers = []
Now we look at all the cells in a row and store the any numbers, ignoring spaces, in the allNumbers list.
        # determine all numbers remaining in the row - store in allNumbers
        for xRange in range(0,9):
            for rowNumbers in currentGrid[(xRange,item[1])]:
                if rowNumbers != ' ':
                    allNumbers.append(rowNumbers)
We are using the xRange value to iterate through all cells in a row. The item[1] value is constant and determines the Y value.
Now we do a similar thing, but we look at all the numbers in the individual cell we are currently in and store them in currentNumbers.
        # determine numbers remaining in individual cell being looked at - store in currentNumbers
        for cellNumbers in currentGrid[item]:
            if cellNumbers != ' ':
                currentNumbers.append(cellNumbers)
If the cell has not been solved we will check the numbers from the cell, stored in cellNumbers against the numbers stored in the list allNumbers. We then check to to see if each number in the cell appears in the row only once.
If we find a number that only appears once we can say that that number is a solution for the cell we are currently in. We can update the grid to reflect this as follows.if len(currentNumbers) > 1: for checkNumber in currentNumbers: if allNumbers.count(checkNumber) == 1:
First we will take a list of the current remaining numbers in the cell and store it a list called currentState.
                    # at this stage we know checkNumber appears only once, so we now update grid
                    currentState = currentGrid[item]
We then iterate through each of the potential numbers in the current state.
for individualNumber in currentState:Check each one to ensure it is not equal to the number we are trying to isolate in that cell, or equal to a space.
if individualNumber != checkNumber and individualNumber != ' ':We then turn these numbers into a space ' ' and update the dictionary in currentGrid to reflect this change.
                            currentState[individualNumber-1] = ' '
                            currentGrid[item] = currentState
Finally we return the currentGrid.
return currentGridWe can now create a function called onlyNinY, which is almost identical to the x function, but focusses on checking the column and not the row. Because it is so similar I wont go into this in any detail, but you should easily be able to spot the differences, and see how they relate to y and not x.
def onlyNinY(currentGrid):

    # check all items in currentGrid list
    for item in currentGrid:

        # create two empty lists
        allNumbers = []
        currentNumbers = []

        # determine all numbers remaining in the column - store in allNumbers
        for yRange in range(0,9):
            for columnNumbers in currentGrid[(item[0],yRange)]:
                if columnNumbers != ' ':
                    allNumbers.append(columnNumbers)

        # determine numbers remaining in individual cell being looked at - store in currentNumbers
        for cellNumbers in currentGrid[item]:
            if cellNumbers != ' ':
                currentNumbers.append(cellNumbers)

        # look at numbers remaining in a cell. Check if they only appear in the column once.
        if len(currentNumbers) > 1:
            for checkNumber in currentNumbers:
                if allNumbers.count(checkNumber) == 1:

                    # at this stage we know checkNumber appears only once, so we now update grid
                    currentState = currentGrid[item]
                    for individualNumber in currentState:
                        if individualNumber != checkNumber and individualNumber != ' ':
                            currentState[individualNumber-1] = ' '
                            currentGrid[item] = currentState

    return currentGrid
Finally we need to look in the square relating to each cell. The function for this is also incredibly similar to the previous two functions, only we need to change our algorithm to check the grid and not rows or columns. Have a look at the function and you will see it is similar to the previous two with the exception that it determines the cells for the square in the same way we did in the removeGrid function in step 6. Therefore there is nothing new in this function we have not seen before.
def onlyNinGrid(currentGrid):

    # check all items in currentGrid list
    for item in currentGrid:

    # determine the co-ordinates for the grid we are dealing with

        if item[0] < 3:
            xGrid = [0,1,2]
        elif item[0] > 5:
            xGrid = [6,7,8]
        else: xGrid = [3,4,5]

        if item[1] < 3:
            yGrid = [0,1,2]
        elif item[1] > 5:
            yGrid = [6,7,8]
        else: yGrid = [3,4,5]

        # create two empty lists
        allNumbers = []
        currentNumbers = []

        #iterates through each of the nine numbers in the grid
        for x in xGrid:
            for y in yGrid:

                # determine all numbers remaining in the grid - store in allNumbers
                for gridNumbers in currentGrid[(x,y)]:
                    if gridNumbers != ' ':
                        allNumbers.append(gridNumbers)

            # determine numbers remaining in individual cell being looked at - store in currentNumbers
        for cellNumbers in currentGrid[item]:
            if cellNumbers != ' ':
                currentNumbers.append(cellNumbers)

        # look at numbers remaining in a cell. Check if they only appear in the grid once.
        if len(currentNumbers) > 1:
            for checkNumber in currentNumbers: #
                if allNumbers.count(checkNumber) == 1:

                    # at this stage we know checkNumber appears only once, so we now update grid
                    currentState = currentGrid[item]
                    for individualNumber in currentState:
                        if individualNumber != checkNumber and individualNumber != ' ':
                            currentState[individualNumber-1] = ' '
                            currentGrid[item] = currentState

    return currentGrid
All that remains is a final F5 to save and run the program. As you click on the cells you will notice that if a number appears only once in the Row, column or square then that becomes resolved.
Sudoku Step 8 Source Code
Now the program is complete why not try seeing how it solves a few real Sudoku puzzles? While it will not solve all puzzles, it will solve some and will aid you solving the more difficult ones. There are loads of resources available on the internet about solving Sudoku. If you would like to look into programming more algorithms to improve your solver the internet is a good place to start.
I hope you have found this tutorial interesting and hopefully you have learnt a lot about programming in pygame along the way, I know I did while writing this blog.