How much fun does that sound?
My mind was made up - I decided to write a time-lapse video program using Python.
I knew taking the images would be quite simple, but the conversion into video would be more tricky.
My first thought was to make use of the openCV libraries again to turn the images into video. However while I believe this is possible, I really struggled to find the solution. Documentation for openCV is very much geared to C++ and not Python.
My second attempt was to use ffmpeg. Some googling had shown this was a nice solution for the conversion. However after installing and running it I got a message saying
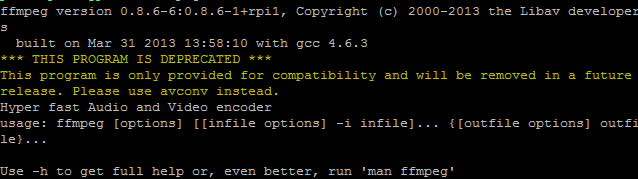
More googling told me I should install ffmpeg from binaries, which I am more than comfortable to do, but it does add complexity into my blog post...
Wait a minute! What was that last sentence on the error message? "Please use avconv instead"
More googling required!
It turns out that avconv does exactly what I need it to do. It converts a pile of images into a video. There are a lot of examples on the web explaining what settings you should use with avconv. However while the avconv website has a lot of information on there I found the best explanation came from the excellent Raspberry Pi Spy website, whose post was also explaining how to create a time-lapse video. Its worth having a look at his page, as he explains how to take images and create video using only the command line.
http://www.raspberrypi-spy.co.uk/2013/05/creating-timelapse-videos-with-the-raspberry-pi-camera/
Right so how do we write a Python program to create a time-lapse video?
The first thing you need to do is to install libav-tools.
Type the following into a command line.
sudo apt-get install -y libav-tools
Here is the full program, have a read through it and see if you can figure out what each line is doing. I will then explain each line in more detail.
import os
import time

FRAMES = 1000
FPS_IN = 10
FPS_OUT = 24
TIMEBETWEEN = 6
FILMLENGTH = float(FRAMES / FPS_IN)


frameCount = 0
while frameCount < FRAMES:
    imageNumber = str(frameCount).zfill(7)
    os.system("raspistill -o image%s.jpg"%(imageNumber))
    frameCount += 1
    time.sleep(TIMEBETWEEN - 6) #Takes roughly 6 seconds to take a picture

os.system("avconv -r %s -i image%s.jpg -r %s -vcodec libx264 -crf 20 -g 15 -vf crop=2592:1458,scale=1280:720 timelapse.mp4"%(FPS_IN,'%7d',FPS_OUT))
To begin with we need to import two libraries, os which will allow us to interact with the command line, and time to enable us to set the time between frames.
import os
import time
Now we will set some global variables. The nice thing about global variables is that you can change a variable that appears all through your program by just changing it in one location. Global variables also make your code more readable, as words explain what the variable is better than a number appearing thorughout your code. It also makes for code which is easier to modify as you know that all your global variables are specified at the top of your code.
We will set 5 global variables.
FRAMES = 1000
FPS_IN = 10
FPS_OUT = 24
TIMEBETWEEN = 6
FILMLENGTH = float(FRAMES / FPS_IN)
FRAMES sets the number of frames or images you will take and add to your video.
FPS_IN sets the number of the Frames Per Second (FPS) that go into the video. So if you want 10 of your frames to be used per second put the value to 10.
FPS_OUT sets the Frames Per Second of the video created. i.e. creates a video running at 24 Frames Per Second. If FPS_IN is less that FPS_OUT some FPS_IN frames will be used several times to bring the number up to FPS_OUT. Setting this value to 24 is a good value for digital video.
TIMEBETWEEN states the time (in seconds) between the frames that you are shooting with your camera. The Raspberry Pi camera takes roughly 6 seconds to take an image, so 6 seconds is the shortest time between shots.
FILMLENGTH works out how long your film will be in seconds. If you want to know this value, then you get your program to print it using the following line.
print FILMLENGTH
I am not going to print this out, but I do use it as a reminder of how long the film I am making will be.
Now we have set up all our variables we can get down to business. We want to take images every so often and save them as files. We will want to keep track of how many images we have taken so we know when to stop. So lets create a variable to do that.
frameCount = 0
The next thing we will do is enter a WHILE loop. A while loop keeps going WHILE something is true
while frameCount < FRAMES:
So while our number in frameCount is less than ( < ) the number we have stored in FRAMES we will run through the next 4 lines of code.
We will create a name for the pictures we want to save.
imageNumber = str(frameCount).zfill(7)The reason we want to do this is we want the files to be stored with incremental numbers. This line is quite clever (I think!)
It says we will create a variable called imageNumber. In that variable we will store a string of the value in frameCount. Remember a string is classed as text and not a number. Then using the .zfill(7) command we will ensure that the string has 7 digits by filling all preceding digits with a zero if there are not enough numbers. Some examples are:
'1' becomes '0000001'
'123456' becomes '0123456'
It's not a tool you use very often, but if you want something to be a certain amount of characters it's very useful!
Now we have the name of the image file we are going to create, lets take the image! We are going to use the line you can type into the shell command to take the image.
os.system("raspistill -o image%s.jpg"%(imageNumber))
What does this line mean? Well the line for taking pictures with the Raspberry Pi camera and storing it as image.jpg is
raspistill -o image.jpg
but this needs to be typed into the command line. Well os.system allows you to access the command line.
You will notice there is a %s in there with %(imageNumber) after the text.
This says, take whatever is in the value imageNumber and put it in place of the %s. So if imageNumber was 0000001 our file would be called image0000001.jpg.
This is a great technique of easily modifying what is in a string.
As we want our number to increase each time we go through the while loop let us now increase frameCount.
frameCount += 1
With imageNumber being made up of frameCount and some leading zeros, each time we run through the while loop we will get a different number as frameCount is increased each time.
Finally we want to be able to vary the time between taking each frame. This allows us to take our images a set distance apart. It takes roughly 6 seconds to take a picture with the Raspberry Pi camera.
time.sleep(TIMEBETWEEN - 6) #Takes roughly 6 seconds to take a picture
Therefore the minimum time between each frame is 6 seconds. If we want the camera to wait 10 seconds per image, as it takes 6 seconds to take a picture we only want to sleep between frames for 4 seconds. Therefore we tell the program to sleep for a period of TIMEBETWEEN - 6.
This brings us to the last line of the code. As I mentioned earlier I found the Raspberry Pi Spy website to have the best details on how to use avconv. They suggest typing the following line into the command line to create video from the images. They also explain why.
avconv -r 10 -i image%4d.jpg -r 10 -vcodec libx264 -crf 20 -g 15 -vf crop=2592:1458,scale=1280:720 timelapse.mp4
I have modified this line slightly to make it a little more suitable for our program. I want to be able to set some of the variables using our global variables. Therefore I have changed the line slightly to this.
We already know why we use the os.system command, as this allows us access to the command line. I have also added in a few %s commands to switch in our global variables. This is using the same technique we used on the line where we took the picture. The difference is there are three variables we are switching in.os.system("avconv -r %s -i image%s.jpg -r %s -vcodec libx264 -crf 20 -g 15 -vf crop=2592:1458,scale=1280:720 timelapse.mp4"%(FPS_IN,'%7d',FPS_OUT))
Let us look at he code inside the os.system brackets.
Most of the code is the same as from the Raspberry Pi Spy webpage, but there are a few differences.
- -r %s this sets the frame rate for the number of our frames we want to use in the video per second. The %s calls the first item in the list %(FPS_IN,'%7d',FPS_OUT), which is FPS_IN, one of our global variables.
- -i image%s.jpg determines the name of the images we want to load into our video. Again we call something within our list %(FPS_IN,'%7d',FPS_OUT), this time the second item. What does %7d do? Remember this is being run in the command line, so it's not a python command. The %7d iterates through 7 digit numbers. This is neat as we created our image files with 7 digit numbers. So it is iterating through the images we created.
- -r %s as for the first -r %s in this line this sets the number of FPS. However we call the FPS_OUT variable and insert this and not the FPS_IN variable. This will create a video of so many Frames Per Second depending on the value of FPS_OUT. If you are unsure 24 is a good default number to use.
All that is left now is to run your program. One word of warning is that avconv is not quick on the Raspberry Pi. 1000 Frames took 3.5 hours to turn into a video. However it's not a huge problem, you just leave it running over night!
I hope you found this tutorial interesting and I look forward to seeing some of your time-lapse videos!
Great blog Trevor. Nicely explained and broken down. Many thanks.
ReplyDeleteTrevor Appleton: Creating A Time-Lapse Camera With The Raspberry Pi And Python >>>>> Download Now
Delete>>>>> Download Full
Trevor Appleton: Creating A Time-Lapse Camera With The Raspberry Pi And Python >>>>> Download LINK
>>>>> Download Now
Trevor Appleton: Creating A Time-Lapse Camera With The Raspberry Pi And Python >>>>> Download Full
>>>>> Download LINK F1
Great Article
ReplyDeleteB.Tech Final Year Projects for CSE in Python
FInal Year Project Centers in Chennai
Python Training in Chennai
Python Training in Chennai
I really like this article please keep it up.
ReplyDeletewill help you more:
you want to make a game using Canvas and HTML5? Follow along with this tutorial and you'll be on your way in no time.
HTML Game Tutorial
We Give out personal loans for debt consolidation, bad credit loans, unsecured loans, loans for bad credit and instant secured loans with cheap rates Do you have a firm or company that need loan to startup a business or need, personal loan, Debt consolidation? For more information. We will provide you with loan to meet your needs. For more information contact Note: And many More:and many more at 2%interest rate; (Whats App) number: +919394133968 patialalegitimate515@gmail.com Mr Jeffery
ReplyDeleteThanks for your own effort on this web page. My mom loves getting into research and it’s really easy to understand why. My partner and i learn all relating to the compelling means you give very useful tricks by means of your web site. 경마
ReplyDeleteWe absolutely love your blog and find nearly all of your post’s to be precisely what I’m looking for. can you offer guest writers to write content for you personally? 온라인경마
ReplyDeleteTrevor Appleton: Creating A Time-Lapse Camera With The Raspberry Pi And Python >>>>> Download Now
ReplyDelete>>>>> Download Full
Trevor Appleton: Creating A Time-Lapse Camera With The Raspberry Pi And Python >>>>> Download LINK
>>>>> Download Now
Trevor Appleton: Creating A Time-Lapse Camera With The Raspberry Pi And Python >>>>> Download Full
>>>>> Download LINK
bitlis
ReplyDeleteurfa
mardin
tokat
çorum
LL73C
yozgat
ReplyDeletetunceli
hakkari
zonguldak
adıyaman
DKİ
ankara parça eşya taşıma
ReplyDeletetakipçi satın al
antalya rent a car
antalya rent a car
ankara parça eşya taşıma
BB41FL
17B02
ReplyDeleteÇerkezköy Boya Ustası
Bitcoin Nasıl Alınır
buy steroid cycles
Aksaray Evden Eve Nakliyat
Sakarya Evden Eve Nakliyat
Kırşehir Evden Eve Nakliyat
Çerkezköy Fayans Ustası
Kars Evden Eve Nakliyat
pharmacy steroids for sale
70956
ReplyDeleteMardin Evden Eve Nakliyat
Kilis Parça Eşya Taşıma
Eryaman Fayans Ustası
Çerkezköy Yol Yardım
Kırklareli Parça Eşya Taşıma
Ünye Oto Boya
Mercatox Güvenilir mi
Edirne Parça Eşya Taşıma
Urfa Lojistik
AC0A4
ReplyDeletehttps://referanskodunedir.com.tr/